
Spiral Curve has been used for the procedural staircase, the Spiral Curve does not have a Count parameter. Using the Count parameter the number of Control points of the curve can be adjusted. Blender version 3.0 is used.

This is the third tutorial of the Procedural Spiral Staircase tutorial series, in the previous tutorial, instance objects were aligned towards center.
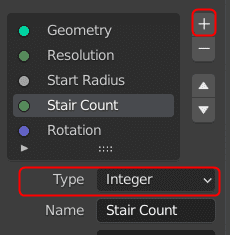
We will be adding Stair Count as a parameter in the Group Input, so that is is possible to change the number of stairs.
Press N key and in the Group properties, add another parameter and change its Type to Integer. Change the Name to “Stair Count”.

The Stair Count should change the Rotation and Height appropriately.
The number of stair objects depends on Rotation and Resolution of the Spiral curve. If the Rotations on Spiral curve is changed the number stairs instances also change.
Stair Count with Rotations
Divide the Resolution by Stair Count using a Math node and connect it to Rotations input of the Spiral node. Add a Math node by clicking Add > Utilities > Math.

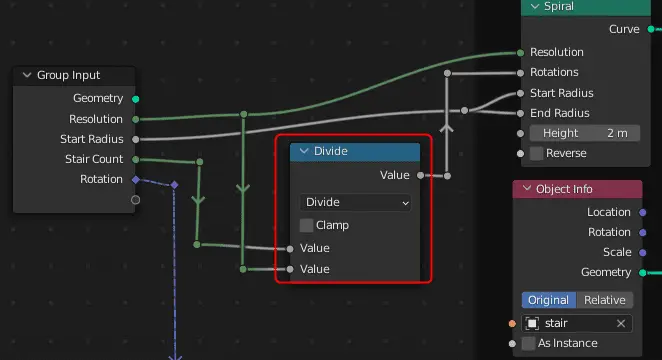
Since Resolution is the number of Control points in a Rotation. So, Increment of one control point is Resolution divided by Stair Count (Control Points). And this is controlled by Rotations.
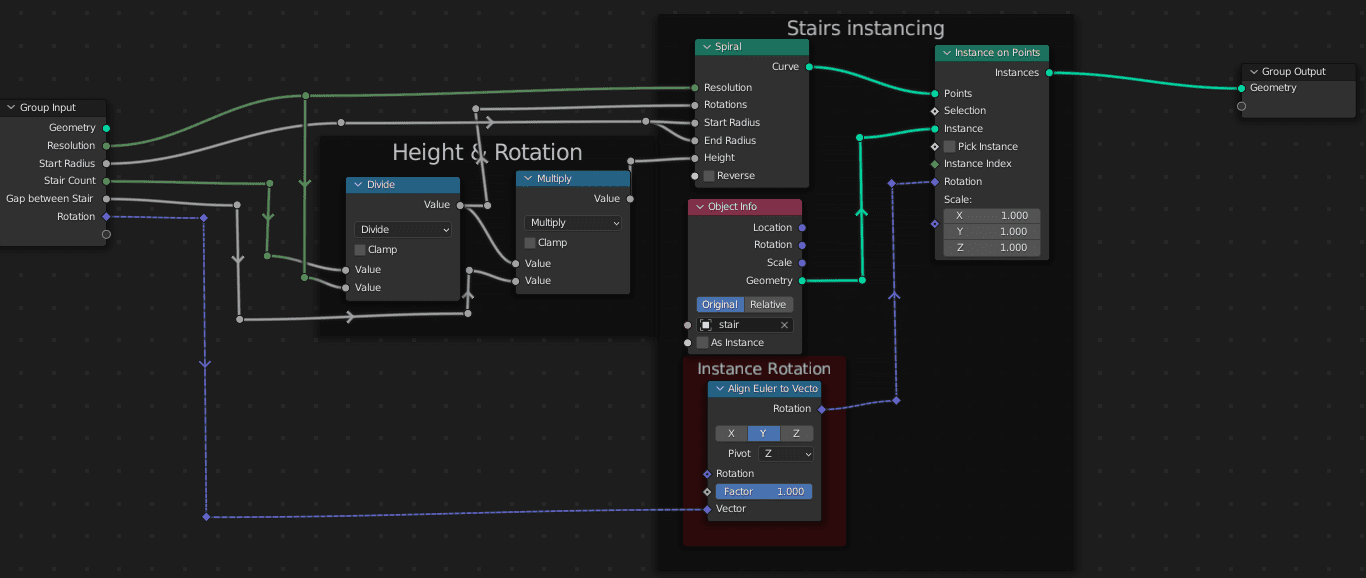
Stair Count with height
When the Stair Count is increased, the height does not change, it is necessary for the height to change. It is also necessary to add a new Parameter in the Group Input “Gap between stairs”, which is the height gap between stairs.
Multiply Rotations by adding a new Math node with Gap Between Stairs and connect it to Height input of the Spiral node.


Now, if the Stair Count is changed, the number of stair instances change and the height also increases.
This is how the Geometry Nodes setup looks.
In the next tutorial, width will be added as a parameter so it can be changed with other parameters: Adding Width as a Group Input.
All the parts of the tutorial series in order:
- Instancing the objects using Instance on Points.
- Aligning the instance objects towards the center.
- Adding Count Group Input to control the number of Control points and Instance Objects.
- Adding Width as a Group Input.
- Adding Baluster or staircase support.
- Extrude a profile curve in Geometry Nodes.
- Move the curve along its path for adjusting and increasing the length of the curve.
- Adding another set of Baluster and handrail in the Geometry Node.
One reply on “Add Count for Spiral Curve using Geomtry Nodes in Blender”
[…] Spiral Staircase tutorial series. In the previous tutorial of the Procedural Spiral Staircase, Stair count for the stair was added, which is not included in the Spiral Curve […]